This album was very well received... Some due to the content, while others due to the processing style. This is a quick introduction to how achieve the overall look that these photographs have. Before we begin, a little bit about the overall philosophy... Digital is great, but it does have roots in analog. When I'm editing an image in Photoshop, I tend to gravitate towards the techniques that are more-less rooted in film processing. Of course, sometimes some techniques do not allow for that, such as generating an HDR image style. But once we're passed that general processing is reduced to very basic modifications, that literally take minutes... So, let's begin shall we?
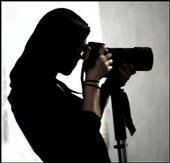
Since bobby picked this image, let's see the unprocessed original and final result side by side:


The photo was shot at f/2.8 so, the blur is natural bokeh. No editing there. The overall style, however is achieved in two steps. First one is to generate a tonemapped image HDR style in photomatrix, and second step is to achieve final stylizing via Photoshop.
PART I: Generating Tonemapped Image
First create a duplicate of your original. It is best to work with RAW files as they contain all data captured by the camera's sensor. If that's not available, no problems, you get results just as good with other formats such as JPEG of TIFF.
Once duplicate is generated, load both images into Photomatrix to generate 32-bit HDR file.
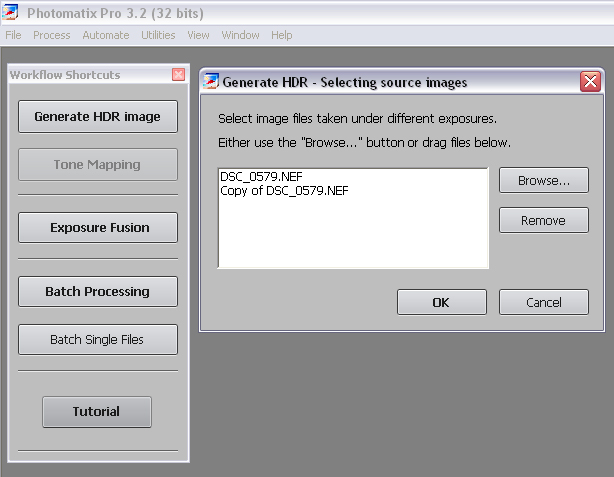
Photomatrix will complain that exposure on both images has the same value.

Manually set it to 2/3 or 1 stop apart to fool software into giving you what you want. For this example, I used E.V. Spacing of 1.

Finally, the 32-bit image is generated, and you're ready to have some serious fun. Click on "Tone Mapping" button and select overall settings to your liking. I generally tend to gravitate towards 5-6 presets that suit my style just fine. If you'd like to me share those, please let me know where I can send them to.
Here you can see my finalized tonemapped image version in Photomatrix with selected settings to achieve an overall look. I'm a huge fan of noise effect, so it's really pleasing how this is brought out (: Click "Process" button to finalize tonemapping for this image.

Part II: Finalizing processing in Photoshop
Save the image as jpeg in Photomatrix and open it in Photoshop. Now you're ready to finalize the look to achieve the overall style. Following is the set of tools used:
1. Saturation is reduced to only give the remaining hint of color. Use "Colorize" option to give the photo tint to your liking (or you can use Photo Filter Adjustment Layer later on, but this is quicker)

2. A layer of curves is applied to bring out the contrast. Photoshop has many wonderful presets. I usually don't go overboard and stick to linear contrast. If adjustments are needed, they're usually minor.

And you're done. Total processing time 5 minutes!!
You can always go back and do further enhancements, but in a nutshell, this covers it.
One of the things I always advocate is that as great as digital editing is, it's not substitute for a good photograph. If the original is no good, nothing can probably save it. When framing the shots, keep that in mind, and you'll never be disappointed. Happy shooting (:


1 comment:
crazy awesome!! Thanks a million!!
Post a Comment