8.30.2008

Photoshop Tips&Tricks: Focus/Shake Recovery

Some images may be recovered or made better from camera shake or bad focus by a simple Photoshop sharpening technique. The results really depend on how badly the image is affected.

1. Open image and duplicate layer (Layers -> Duplicate Layer. Name your layer "Sharpening Mask")
2. Change blending mode of the "Sharpening Mask" to Luminosity (Layer -> Layer Style -> Blending Options. Select Blending Mode to Luminosity)
3. Unsharp image (Filter -> Sharpen -> Unsharp Mask. Select appropriate settings to taste. If image quality is severely degraded, amount is usually kept to higher numbers. Radius and Threshold values are usually kept very low (e.g. 1).
4. Duplicate "Sharpening Mask" layer, and apply Gaussian Blur filter to recover image quality.
5. Modify layer's opacity to your taste and apply Color blending mode to the layer (Layer -> Layer Style -> Blending Options. Select Blending Mode to Color).
6. Modify Curves/Levels adjustment to help bring out the detail.
7. Flatten layers to finalize image processing.

This image is very blurry due to the camera shake during the exposure. While letters offer some readability, architectural and stain glass detail is severely brulled out.

After applying sharpening mask technique on the image, smaller letters are more readable, and detail is recovered in the architectural detail and stained glass. This solution is not perfect for severely blurred images, but work really well in less extreme cases of camera shake and soft focus.

Photoshop Tips&Tricks: Contrast Mask

Very often times composition will create light/exposure challenges. For example, very bright sky and dark ground. Another common occurrence is intentionally under- or over-exposing the image in order to capture important detail. This is common when trying to retain bright colors and highlights of the sunset or details in dark object(s) near a strong light source.

As a result of scewed exposure, portion of the photograph unavoidably contain too much dark or light areas. One of the ways of compensate for this drawback is to use HDR technique (covered in previous post). However, that may not always be possible. Further, HDR introduces "surrealistic" feel to the image, and this may not always be artistic intent. The simpler approach is to use Contrast Mask easily rendered in Photoshop (although this technique does have roots in film photography dating to nearly 100 years ago). It is best that contrast mask is applied to images in RAW format, but works just as well with JPEGs. Here's how:

  1. Open the image and create duplicate layer of the background (Layer -> Duplicate Layer). Name your layer "Contrast Mask"
  2. Convert "Contrast Mask" to monochrome image (Image -> Adjust -> Desaturate)
  3. Covert "Contrast Mask" to negative (Image -> Adjust -> Invert)
  4. Apply overlay blend to the "Contrast Mask" (Layer -> Layer Style -> Blending Options. Select Blending Mode to Overlay).
  5. Reduce image degradation by blurring (Filter -> Blur -> Gaussian Blur. Select desired pixel radius value. Larger values tend to introduce halos on sharp contrast areas, while low amounts minigate the effect.
  6. Adjust opasity of "Contrast Mask" to the desired level (usually anywhere from 50-80%)
  7. Fine-tune the image by adjusting levels and curves to your taste (Layer -> New Adjustment Layer -> Levels/Curves. Check the box "Use Previous Layer to Create Clipping Mask" to apply changes to the "Contrast Mask").
  8. Flatten layers to finalize image processing.

This image was intentionally underexposed in order to capture sun beam highlights in the sky. As a result bottom portion of the photograph is too dark. Adjusting curves or contrast of the image will sacrifice the dramatic sun beams of the sky rendering them hardly visible.


After applying contrast mask, the colors and highlight of the sky were retained, and initially very dark areas were brightened to reveal all the detail and color.

8.19.2008

David Griffin on Photography

Ted Talks had released a video today (originally filmed in February 2008) of David Griffin's overview of world photography. Griffin's work is known world wide and earned him much recognition and awards. He is currently a photography director of National Geographic magazine.

In this talk, his insights are thought provoking as he overviews world and personal perceptions captured and reflected through film. Most importantly, he conveys that little something something that allows to grasp what separates armature photographer from a photojournalist. (I gap that I myself am hopeful to mitigate.)


6.22.2008

Photography Tips&Tricks: ISO

DSLRs have a great advantage over 35mm cameras: film speed can be changed on demand. With 35mm cameras what ever speed of film roll you loaded, you would have to finish it before changing the speed by loading a new roll. So, what is ISO and what all those numbers mean?

ISO refers to sensor's sensitivity to light (in other words, how much light is absorbed by the camera sensor). The lower the number (slow speed), the less sensitive it is. The higher the number (high speed), the more sensitive it is. The camera is equipped to auto select ISO settings, however, those decisions may not always meet the photographer's expectations. Knowing which settings to select and when can improve the quality of images dramatically.

There is no free lunch, and ISO settings have trade-offs to be taken into consideration:
The slower the ISO, the longer exposure is required to record the image. The faster the ISO, the shorter time it takes to record the image. So, speeding up your settings allows you to use faster shutter speeds. This is especially handy in low-light conditions and to counter-act camera shake (covered in previous post).
- BUT -

Using higher ISO speeds introduces noise (aka film grain), and causes your image quality to degrade. Where using lower ISO speeds yields to clearer images. So, choosing your custom setting you have to be mindful of speed vs. quality balance.

Selecting ISO speed depends on light conditions. As a general rule of thumb, there are five "benchmark" speeds: 100, 200, 400, 800, 1600 (most camera's ISO options may exceed this range). ISO speed is increased as light availability decreases. The less light, the higher the ISO. "Ideal" speed/light matching is then as follows:
  • ISO 100: abundant light conditions (e.g. bright sunny day)
  • ISO 200: mild light conditions (e.g. partly cloudy sunny day)
  • ISO 400: moderate shade or heavy cloud overcast
  • ISO 800: indoors or early evening
  • ISO 1600: night photography
Your camera auto selection will roughly reference these lighting conditions when selecting the ISO settings. Most of the times these setting will be adequate, however, there are times where you can "afford" to select a different speed. You can complement your shutter and aperture settings by taking into account ISO exposure factor. For example, when shooting in low light conditions but have an advantage of using a tripod and camera shake is not a concern, lower ISO setting can be chosen to obtain less noisy images. Or when photographing children or animals in a good lighting conditions, the shutter speeds may be deliberately increased as photography subjects move fast and unpredictably, so upping the ISO to 400 instead of 100 may be a good call. Deliberately upping your ISO settings may also allow you to increase your depth of field by stopping down your aperture settings (or vice versa). Hence, knowing how ISO speed works can produce good image results, extend flexibility to aperture/shutter settings and help control image exposure.

Photography Tips&Tricks: Camera Shake

There's probably nothing worse than viewing your photograph on the big computer screen and seeing that photo is too soft or blurry: great shot has been ruined and no amount of sharpening is going to fix the image. You've been a victim of camera shake. Blurring occurs because camera was not stable during the exposure (while the image was recorded). The problem is common, and it's because we're human. No one can hold the camera perfectly still, and longer the focal length at which the photograph was taken, more profound the impact unsteadiness has on the image. Even with camera mounted on a stable surface, pressing the shutter release button (or in some cases even mirror movement) may cause enough vibration to introduce blur into the image.

An ideal way to eliminate camera shake is to use the tripod with a shutter release cable or a more advanced setup, but that may not always be possible. Below are some tips that will mitigate unintentional motion blur:

1. Monopod
Monopod is a great alternative to tripods as they do not limit your mobility. They are ideal for use in sports photography because they allow pan movements and relocation with ease. Monopods are usually lightweight and offer fair support to help stabilize a camera.

2. Shutter speed control
When possible to increase your shutter speed, camera shake can be prevented by adjusting your shutter to out-fast the shaking of the hand. The ideal shutter speed should be set at or faster to the inverse of your focal length. For example, if image is taken at 200mm, the shutter speed should be set to 1/200 or faster. DSLR FOV (field-of-view) should be taken into consideration. Most modern digital cameras will have 1.5 FOV crop (refer to the camera manual for your crop factor). That means that lens' actual focal length is multiplied by crop factor to be equivalent to focal length that you're shooting at with DSLR. So, at 200mm, the actual focal length is 200mm x 1.5 = 300mm. Hence, the shutter speed should be adjusted to 1/300 or faster to avoid camera shake.

3. Holding the camera correctly
How you hold the camera makes a very big difference as well. If both hands are placed on camera body, the lens roams and worsens camera shake effect. However, if one hand is placed under the lens on its outer edge to stabilize it, the effect would be minimized. Elbows should be tucked firmly on the sides of your torso. You can also help to minimize shaking by firmly pressing your face against the camera while looking at the view finder and holding the breath while taking a shot. Maintaining relaxed body posture will eliminate instability caused by muscle tension. Further sturdiness is achieved by moving your legs shoulder-width apart. Remain still for a moment after the shot has been taken. Often times, premature movement induces the blur effect.

4. Anti-shake technology
There is a variety of lenses available to specifically address the problem of camera shake. These types of lenses will not help you in action photography (such as sports), but can help reduce and even eliminate camera shakes with relatively still objects.
Nikon calls it VR (Vibration Reduction)
Cannon calls it IS (Image Stabilization)
Sigma calls it OS (Optical Stabilization)
Tamron calls it VC (Vibration Compensation)
....and there are a few others

They come with a hefty price tag, BUT they help and they work. Keep in mind, these lenses do not perform miracles, just improve your odds. I feel it's a good investment, and have gotten outstanding results with my Nikon VR lens. Some camera models (e.g. Sony, Olympus, Pentax) have anti-camera-shake technology built into the camera body rather than lens.

5. Shock absorption
In macro-photography or at extreme zooms even slightest vibration can ruin the shot. Chances are even with a tripod, the vibration that occurs with shutter release action and mirror movement can introduce blurring. Using shutter release cable will help. Neutralizing mirror movement is tricker, but placing a weighted wrap (such as a bean bag or a relaxed hand on top of the lens with gentle press) will absorb the vibration.

Using methods above alone or in combination will help to achieve relatively blur-free images. Just as anything, the results do get better with more experience and experimenting. Happy shooting (:

6.18.2008

Photography Tips&Tricks: How to use a Histogram

DSLRs have many tools to assist in capturing amazing images. One of the easiest to use and most useful is histogram. After the image has been taken, a histogram of tonal range is displayed giving an immediate feedback on the quality of exposure. Understanding how to use this feedback can help to learn to understand light and master exposure in your photography.

But first things first, what is a histogram? Well, let's start with an example. Imagine you went to a fruit market, and here's what you bought.

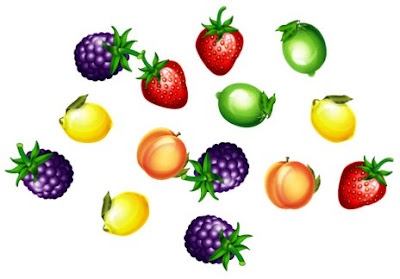
If you were to organize all the fruits and berries into a histogram it would look something like this:
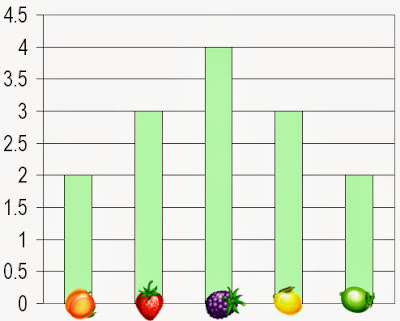
So, just by looking at this graph, we already know that we have the most blackberries; peaches and limes are the ones that we have the least. Now, if for whatever reason you expected to buy lots of peaches and limes, but no blackberries, this chart will tell you that something went wrong. Right off the bet, you can go back and correct your mistake.

DSLRs do exactly the same thing. Histograms contain information on tone distribution throughout your image and the density of pixel distribution (in other words, count of color pixels, just like count of peaches and strawberries). So, if you see that your "count" is off, you can go back and correct your mistake by re-taking the photograph.

Using Histogram: How to read the Graph
Reading the histogram is easy. Horizontal axis tell you about the tone of the photograph. It goes from pitch black on the left (0) to brightest white (255) all the way on the right. As a tonal range scale it would look like this:
0255

The vertical axis tell you about intensity of color in your photograph. The higher the peak, the more color you have. In the example above, blackberry had the highest peak because it had the highest count. Peaches and limes were present, however they had the lowest count. If this were an actual histogram, blackberry would represent colors that correspond to mid-gray shade range (mid-browns, blues, etc..); peaches would be dark shades and limes would be bright highlight tones. So, the histogram curve displays the color intensity. Tones with higher distribution will show as higher peaks. The lower the distribution, the lower the peak.

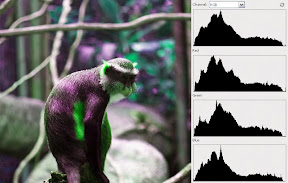
Let's take a look at the actual photograph and corresponding histogram. In the example below there are total of four charts. First one is RGB (Red, Green, Blue) histogram. It provides feedback on the overall (or combined) tonal range of the photograph. The 3 charts below (Red, Green and Blue respectively) provide feedback on each of the individual channels for more detailed information. These graphs can be useful because they may indicate that a channel has excessive "clipping" which may not be evident from RGB histogram.

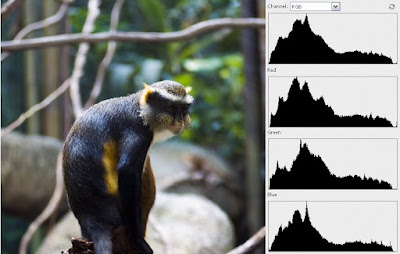
The photo below has good exposure because we can see a nice curved shape. Darker and mid-tone shades dominate this composition, and that is reflected by a higher peak on the left side of the graph. However, lighter shades are also captured, as indicated by the graph, hence detail in those regions is preserved. Even, if this image is still too dark for the taste, during post processing lighter portions can be enhanced further because that information registered properly and retained in the photograph. Please note, that histogram will not tell you if your photo is of good aesthetic quality or contains a proper color balance. Just that your image has captured good information and brightness levels of shadows and highlights are nicely distributed.


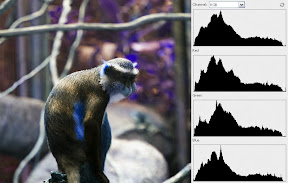
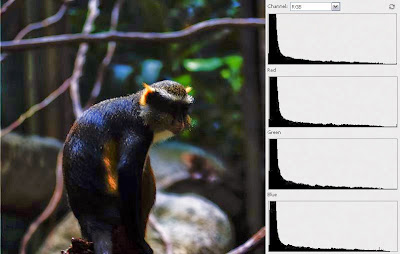
Let's see what happens if we were to select a portion of the photograph from the original. Sample indicated by the red rectangle was used to collect the data in this histogram. There are clearly two steep peeks on each side forming a "valley" shape. This is bad because tones in those areas are very dark (on the left) and very bright (on the right). Information that usually falls in that tonal range contains no value. Very bright or very darkly exposed images lack definition and even with post processing image is unrecoverable. So, ideally, when looking at the histogram, most of the values should not be concentrated by the extreme edges of the graph.

So, what histogram actually shows is the amount of shadow and highlights that have been captured by the camera sensor. Brightness and darkness levels determine proper exposure. It has absolutely nothing to do with hue of the color, just its intensity. For example, let's take a look at these three images. While color hue varies drastically, the tone stays in a same range, hence the histogram is identical for all three images
.

Using Histogram: Practical Application
This is an example of an underexposed image. Mid-range and high tones are almost not present in this image, however, dark tones are at the highest peak and dominate the image. What can you do to fix it? There are several approaches. If you cannot control the light, try to open up your aperture, decrease your shutter speed, raise ISO, obtain additional light by using a flash or use positive exposure compensation to obtain proper exposure.


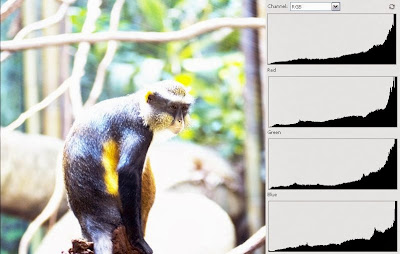
This example shows a histogram of an over-exposed image. Most tones are very bright and histogram reflects that by dominating peak on the right-extreme side. To fix this, try stepping down your aperture settings, increase your shutter speed, lower ISO or use negative exposure compensation. If after adjustment results are still not enough, try using ND (Neutral Density) filter to reduce the amount of light entering the lens.


Trying to avoid peaks at the edges of the histogram is not always the goal. For example, if composition contains a strong light source (such as sunny window), histogram will reflect that with peaks on the far right. If shooting at night, far left side will contain a peak. So, in essence, it is a reference tool to check if the image captured contains the tonal range that you would expect. While histogram will not tell you if the image is "good," it will provide feedback of how much of the image has no usable information (located at the extreme ends of horizontal axis) and serves as a good exposure indicator.

6.16.2008

Photography Tips&Tricks: How to Photograph Water Drops

The images of water drops are abstract and breathtaking. They can be challenging to achieve, but oh so worth it. When taking on this project, pack your patience. You may get lucky right away, but chances are it will take many many many ...many tries before you get *the* shot you are after.

Camera settings:
In order to successfully capture the droplets very fast shutter speeds (1/200 or higher) are a must, so having abundant light source is essential. It is best to use the daylight and place your setup in a good lit area, as artificially supplying this much light can be rather challenging. Aperture settings are usually set in low to mid-low range (e.g. f/3.5-6). These settings are selected when camera is in manual (M) mode. Focus should be set to manual as well. ISO can be kept low (100-400).

Setting up the shoot:
You will need a water drop "maker." For this purpose the most simple approach is to use a dropper. You can also rig your sink faucet to produce drops of water at a particular interval. Another creative way of producing water drops is to suspend a water balloon with a tiny pinned hole. Next, set up some type of water container and a background. This could be anything. Monotone surfaces help to enhance the abstract shapes, while colorful patterns are optically rendered in the drops and produce rather interesting visuals.

The final step is to mount the camera on a tripod and favorably frame the shot. Once you've decided where droplets will be (such as a point at the surface of the water or somewhere mid-air), hold an object, such as a pencil, in that location, manually focus and lock on. Make sure that a rig that you've set up is aligned to dispense drops to that location.

Photoshoot:
This step is all about reflexes. At times it can be rather difficult to coordinate pressing the shutter to capture the droplet while looking through the viewfinder, so using a shutter release cable will help.

Lastly, this technique is not just limited to water drops. Many phenomenal images can be produced with a wide variety of liquids such as india ink or soy milk. Mixing liquids of different colors can also produce interesting results. Happy shooting (:

Photography Tips&Tricks: How to Photograph Smoke

When moving in abstract photography direction, just about everyone wants to take amazing pictures of smoke. Surprisingly, they are very easy to capture. The greatest challenge however, lies in setting up the rig to stage a great shot. There is a bit of experimenting involved, and there is not a single "right" way of doing it. The general approach to help you get started, however, is as follows:

1. Dark room and illuminating the smoke in a right way is a key to a successful image, so it is best to do this in the night time. Also keep in mind that smoke must be relatively still, hence it is not recommended that you do it in a space where there's a great deal of draft, but keeping room well ventilated is important for your own safety.
2. You will need a source of smoke, and incense sticks work great.
3. A black backdrop against which photograph of smoke will be taken.
4. Lastly, a flash.

General Setup:
Below is the diagram of a general layout for shooting the smoke photographs. It is best if you have a remote flash and can illuminate the smoke from a perpendicular angle, however direct flash will work as well, just be aware that it may highlight the backdrop and ruin the contrast effect. To remedy this, move smoke source further away from the backdrop and try to adjust your flash settings to fire at closer distance (refer to your flash manual on manual adjustment of internal light meter). Trick here is very similar to photographing something at night. Flash illuminates your object while background remains dark. It is a bit more challenging in the constrained space, but still possible.


Tip: sometimes it is difficult to focus manually on dynamic smoke, so you can take advantage of the autofocus feature. To help your camera, use a small flashlight set up from the side, top or bottom to illuminate some of the smoke. You can wrap opaque paper around the flashlight to ensure a relatively narrow beam of light. The most important thing is to keep light from hitting the backdrop. Be sure to have your camera set on continuous focus if choosing to go this route.

Camera settings:
Open your lens to the smaller aperture settings (such as f/16-22). This will ensure that most of the image is in focus. The shutter speed is also important because you're attempting to freeze motion. However, most cameras will be limited to the shutter speed of 1/250 with flash enabled. Another important thing to keep in mind is your ISO settings. Choosing the lowest ISO setting possible will help to reduce the noise (dark images are severely prone to noise). Going above 400 is not recommended. 100 of course is ideal. It is best to set your camera in manual (M) mode, and then adjust the aperture and shutter speed settings as necessary to get the desired results.

Now you're all set, so most importantly don't forget to have fun. There's plenty to experiment with. One of the great ways to enhance the image is the use of colored gels on your flash to give smoke different color characteristics. Mixing and/or overlaying gels of different colors yields to spectacular results. Smoke images also lend themselves to be great candidates for digital editing. Fantastic photographs can be achieved by adjusting saturation levels or inverting the image.

And, of course, if you're looking to be inspired check out the Flickr: The artsmoke Pool

6.15.2008

Photoshop Tips&Tricks: HDR

This is a quick and dirty introduction to creating HDR (High Dynamic Range) images with Adobe Photoshop. This works in both CS2 and CS3 versions.

HDR is "new" and HDR is cool. It can help to resolve many exposure challenges that are presented when photographing various objects and scenes. One of the most common examples of this a scene that frames both: indoor and outdoor scenario. Most commonly, indoor portion of the photograph will come out underexposed with detail flat and dark while outside will be overexposed with highlights blown out of proportion. Even when photographing landscapes, tricky lighting make it very difficult to find a proper exposure balance for all the elements in the shot. HDR can help. The technique is most effective when applied to scenes with relatively still objects.

By taking a series of bracketed exposures (in other words 3 or more photographs each taken at different exposure value), the resulting images each will contain different level of detail located in various areas that are properly exposed. By then combining these, the resulting image will encapsulate all of the detail that would be impossible to obtain in one shot.

So, here's how to get started. First and foremost, it will make it very easy to achieve best results if all photographs are taken when camera is mounted on a stable surface or a tripod. This will save a great deal of processing power because processing alignment of the images for merging will be minimized (in some cases alignment fails, so it should not be relied upon) . Next, take a series of shots with different exposure values varied at 1 stop each. Three is the minimum requirement to process the images in Photoshop, but depending on the lightning challenges there can be as many as reasonably needed (usually around 6 or so in most cases).

Photoshop produces best results with images in RAW format, so using them is encouraged. Once you have the series of the images with variant exposures, HDR process is as follows:

1. Create 32-bit HDR image file
- select Open -> Automate -> Merge to HDR
- load set of source photographs for processing
- check "Attempt to Automatically Align Source Images" to ensure proper alignment
- click 'Ok' to initialize HDR processing
- HDR tool then displays a preview file with resulting histogram from all images. It may look very dark or very bright, but do not be alarmed. HDR tool will also display the "White Point" slider preset at the most optimal point according to the algorithm. It is not always reliable as some highlight detail can be lost with the automated setting. Usually shifting the slider towards maximum value fixes this problem.
- Click 'Ok' to generate 32-bit HDR image file

2. Convert HDR to 16-bit (or 8-bit) LDR (Low Dynamic Range)
- Select Image -> Mode -> 16 (or 8) -bit Channel
- Once file has been converted to LDR, HDR Conversion tool will allow to adjust the image for digital processing. This is the final step in creating desired image. Four options are available via this tool:
  • Exposure and Gamma
  • Highlight Compression
  • Equalize Histogram
  • Local Adaptation
Each one of these settings will allow you to adjust image's contrast and brightness to achieve the desired effect. Most flexible is "Local Adaptation" as it uses data based on pixel-per-pixel range to adjust values rather than image information in whole. Experiment with various Radius (range affected based on pixel location) and Threshold to achieve the desired results. In most cases, HDR created images require some additional processing to adjust saturation levels and reduce noise.

Below is an example of an image created via HDR tool in Photoshop.

Photography Tips&Tricks: Zoom Burst

There's a really interesting visual technique called "Zoom Burst." It can be used to stimulate movement of a still object with motion blur or just render an artistic effect. Of course, this effect is easily rendered in photoshop or any other image editing software, but a fantastic image can be made just as well if not better by using your camera.

Here's what you'll need:
1. A still object (an obvious requirement)
2. A lens with zoom capability set to manual focus
3. A tripod (holds the camera still for desired effect)

Compose your shot and zoom to the desired range on the object. Set focus, and zoom out or in (depending on the effect you're trying to achieve) to the desired focal range. The object may be out of focus at this point, and it's ok (:

Select Shutter Speed (S) priority mode on your camera, and set it for relatively long exposure. The time interval that you select will be used to zoom to the desired point, so usually anywhere from 1 second and up will do the trick.

Press the shutter down, and smoothly zoom in or out to the point you've focused on previously. Remember: smoothness is the key here. While the camera is recording the photo, you will not be able to view the image in the viewfinder, so it's a good idea to refernce the mark on your lens zoom scale.

Below is this technique demonstrated on a lovely Venetian mask that I have hanging on my wall. These were all taken with a 10 second exposure, and I've used varying zoom barrel rotations to introduce different effects. The results will look something like this:

Original image


This was done by using 2/3 of the exposure time to zoom in and 1/3 at the final zoom point.


This was done by keeping the zoom in rate constant during the exposure.


This was done by keeping the zoom out rate constant during the exposure.

Photography Tips&Tricks: Aperture vs. Shutter Priority Mode

When beginning to take more control of the photography using custom modes is essential to ensure that resulting photograph reflects the artistic intent. By learning the benefits of various modes, creative control can be easily achieved.

So, when do we use Aperture (A) priority mode and when do we use (S) shutter speed priority mode? After all, both aperture and shutter speed share similar function: control how much light is hitting the camera sensor to record the image.

Well, the general rule of thumb is that Aperture (A) priority mode is reserved for relatively still objects, while Shutter Speed (S) priority mode is more suitable for moving objects. Aperture gives you control over depth of field (DOF), while Shutter Speed gives you control over how objects are frozen in motion.

Larger Aperture values (such as 2.8 and 3.5) keep your object in focus, while blurring the background. This is an excellent approach to isolate a person for a portrait or mitigate the effect of the busy background and draw attention to the focal point. The smaller the aperture value is (such as 18 or 22), the more of the photograph will be in focus with everything appearing clear.

large aperture (f/2.8) was used to isolate the flower from the busy background


small aperture (f/18) was used here to capture all the details in the scene

Shutter speeds do something slightly different. Shorter shutter speeds allow the objects to be frozen in motion (such as 1/1000 or 1/400), while longer shutter speeds allow for capturing movements resulting in motion blur effect (such as 1/4 or 30 second exposures). For example, short shutter speeds will freeze drops of water mid-air or capture dramatic pose in the sport game, while longer shutter speeds can be used to introduce silky effect to the waterfall or capture long trails of car headlights during night photography.

Shutter Speed: 1/100 vs. 1/8

Needless to say, it's also important to understand what effect the overall light conditions have on the camera sensors. With plenty of light, very fast shutter speeds can be achieved as not much time is needed to record the image. In a low light conditions, shutter speeds tend to be generally slower as it takes longer for the sensor to record the information. This is why sometimes the expression "fast lens" is used. These are generally lenses that have very large aperture values (such as f/1.4 or f/2.8). That means that even with the lack of abundant light, the lens can still open wide enough to let enough light through for the shutter speed to remain relatively short. As you may have guessed, these lenses can be rather expensive, but worth it because they expand the range of creative control dramatically.

One important thing to keep in mind is that Aperture and Shutter Speed are reciprocal of each other. The larger the aperture value (approaches the value such as f/1.4 or f/3.5), the more light is entering the lens, hence the shutter speed can be very small in fair lighting conditions. The smaller the aperture value (approaches value, such as f/22 or f/32), the less light is entering the lens, hence, shutter speed will need to be slower to allow more light to hit the camera sensor to record the image. This of course, works in reverse for the shutter speeds. The shorter the speed, the more light needs to hit the sensor, hence aperture approaches its maximum value.

There is, of course, the "holy grail" of photography, which is a manual (M) mode that allows complete control over both Aperture an Shutter Speed values, but more about that later (:

Photoshop Tips&Tricks: How to even out skin tone

Flawless complexion can be achieved in Photoshop in just a few easy steps:

1. Open the image to be modified
2. Duplicate the layer to safeguard against mistakes (Layer -> Duplicate layer)
3. If desired adjust image overall contrast via curves (Image -> Adjustments -> Curves), and duplicate the layer (step 2)
4. Convert Layer to Black and White mode (Image -> Adjustments -> Black and White)
5. In the "Preset" drop down list select to apply "Red Filter" to enhance for milky complexion
6. Apply "Soft Light" to the layer and set Opacity to the appealing level (usually range of 55-80%)

6.14.2008

Photography Tips&Tricks: Exposure Control

DSLR's automatically select exposure control, and while the decisions that camera makes are adequate, there are situations where actual results do not meet "artistic" expectations.

For example:
When photographing a sunset, capturing breathtaking colors is of the essence to showcase the dramatic event. Most will find that when photograph is taken, the colors look a bit washed out and plain. On the other hand, when trying to photograph a mid-tone or a dark object that is located next to a source of light (such as an object placed next to a window on a sunny day), the resulting photograph lacks details, and focal point of the composition appears dark and dimensionless.

To avoid this, use exposure compensation to override settings that camera thinks are correct for a given lighting conditions. This feature is accessible on DSLR when switched to any of the custom modes, such as P (programmed), A (aperture priority), S (shutter speed priority) or M (manual). Refer to your camera manual on accessing exposure control scale.

In the example of the sunset, deliberate under-exposing will bring out the vibrant colors. By using EV scale, move the marker in the negative direction. Each shift will cause the exposure to darken by the factor of two. Hence, EV value of -1 will yield to exposure twice as dark, and value of -2 will yield to exposure four times darker, etc...

automatic exposure at EV 0


exposure compensation at EV -3 helps to bring out vibrant colors

In the second example of photographing an object next to a light source, deliberate over-exposing will allow to see the details with clarity and dimension. To over-expose the photograph, move the maker on EV scale in the positive direction. Just as with negative exposure values, the EV value will adjust exposure compensation by a factor of two.
automatic exposure at EV 0

exposure compensation at EV +5 helps to bring out the detail otherwise lost

Experimenting is essential in the process. Begin by adjusting the exposure scale in the desired direction at the smallest interval, gradually increasing until desired results are met. Once behavior of the camera is learned, the intuitively correct compensation adjustment will become a second nature.

Of course, if you shoot in RAW, exposure adjustment can be easily achieved by modifying the photograph via image editing software (such as Adobe Camera Raw). JPEG encoded images can also be adjusted for exposure, however, the results are limited as not as much information is stored in this format.