Showing posts with label photoshop. Show all posts

5.17.2010

Image Processing skymyrka style (:

This album was very well received... Some due to the content, while others due to the processing style. This is a quick introduction to how achieve the overall look that these photographs have. Before we begin, a little bit about the overall philosophy... Digital is great, but it does have roots in analog. When I'm editing an image in Photoshop, I tend to gravitate towards the techniques that are more-less rooted in film processing. Of course, sometimes some techniques do not allow for that, such as generating an HDR image style. But once we're passed that general processing is reduced to very basic modifications, that literally take minutes... So, let's begin shall we?

Since bobby picked this image, let's see the unprocessed original and final result side by side:
The photo was shot at f/2.8 so, the blur is natural bokeh. No editing there. The overall style, however is achieved in two steps. First one is to generate a tonemapped image HDR style in photomatrix, and second step is to achieve final stylizing via Photoshop.

PART I: Generating Tonemapped Image
First create a duplicate of your original. It is best to work with RAW files as they contain all data captured by the camera's sensor. If that's not available, no problems, you get results just as good with other formats such as JPEG of TIFF.

Once duplicate is generated, load both images into Photomatrix to generate 32-bit HDR file.
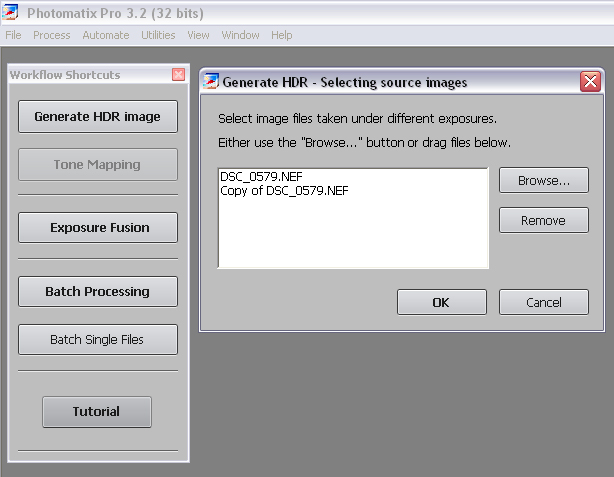
Photomatrix will complain that exposure on both images has the same value.

Manually set it to 2/3 or 1 stop apart to fool software into giving you what you want. For this example, I used E.V. Spacing of 1.
Finally, the 32-bit image is generated, and you're ready to have some serious fun. Click on "Tone Mapping" button and select overall settings to your liking. I generally tend to gravitate towards 5-6 presets that suit my style just fine. If you'd like to me share those, please let me know where I can send them to.

Here you can see my finalized tonemapped image version in Photomatrix with selected settings to achieve an overall look. I'm a huge fan of noise effect, so it's really pleasing how this is brought out (: Click "Process" button to finalize tonemapping for this image.


Part II: Finalizing processing in Photoshop
Save the image as jpeg in Photomatrix and open it in Photoshop. Now you're ready to finalize the look to achieve the overall style. Following is the set of tools used:
1. Saturation is reduced to only give the remaining hint of color. Use "Colorize" option to give the photo tint to your liking (or you can use Photo Filter Adjustment Layer later on, but this is quicker)

2. A layer of curves is applied to bring out the contrast. Photoshop has many wonderful presets. I usually don't go overboard and stick to linear contrast. If adjustments are needed, they're usually minor.

And you're done. Total processing time 5 minutes!!
You can always go back and do further enhancements, but in a nutshell, this covers it.

One of the things I always advocate is that as great as digital editing is, it's not substitute for a good photograph. If the original is no good, nothing can probably save it. When framing the shots, keep that in mind, and you'll never be disappointed. Happy shooting (:

StarTrails: Quick Guide

Earth rotates.  As it does, stars visible in a night sky change position relevant to the Earth's surface.  The rotation happens a great deal faster than one would expect, and even with 30 second exposure of the night sky the star tracking becomes visible.  Outlined below is a basic technique that allows to capture a series of images of the night sky.  Later, combined, they reveal starTrails.

  1. Pick a location with absence of strong artificial light source. Best is to find something way outside the city lights, highways (headlights), etc.
  2. Best to do it on a cloudless and moonless part of the night (or new moon)
  3. Steady tripod is a must. Point your camera at an angle from south or north location: you'll get more pronounced trails and curvature will be more visible. So you'll get better results in shorter time period.
  4. Set your lens to a short focal length available (I used 50mm prime for the photo featured above, but also got good results with 18mm). Focus to infinity, then pull back just a tad. I find I get the best focus if I'm not at the max.
  5. Finally, set your camera on manual, and shoot away. Choose largest aperture (anything 2.8 or more is recommended). I set my iso to 400 (good compromise for noise on film vs sensitivity - if you don't have a lens that gives you big aperture e.g. f/3.5 or less - up your iso a bit ), White Balance usually set to fluorescent (preserves "natural" color in my opinion), unless you want to modify it manually, but even with batch processing I usually end up with hundreds of images, so it's a pain :/
  6. I keep exposure time usually to 30 seconds. anything more, and trails become visible on current exposure, so once images are combined, it looks messy
  7. It's good to use some type of timer for continuous lapse shots. I use a timer on the battery grip, but also have used a cheaper solution: standard shutter release cable and just taped down /lock the shutter button so camera keeps firing continuously.
  8. Finally, processing. The shot above is HDR of 11 images, each taken at 5 min. interval. That what gives it that dots effect (there's a 5 min lapse between each gap over 2 hr period). But you can also use many fantastic *free* apps out there, such as IRIS or starTrails to combine/stack images. Finally, you can also use each image as frame and make an animation. search "timelapse photography" on youTube. There's amazing work out there.
p.s. here's the "continuous" image stack of the same shoot combined in starTrails. I wasn't happy with the results, but here it is for comparison


Animating Star Trails:
With captured images, you can also create an animation to demonstrate star movement.  This is an example of a movie made with frames from the same shoot.  

I use Adobe CS4 for post-processing and to compile animation. To create the animation , do the following:
post-processing
  1. Open Adobe Bridge
  2. Select all files from your shoot
  3. Double click on any one of the images to open series in Photoshop
  4. Do "select all" and perform post-edits to your preference (e.g. WB tweaks, noise reduction, crops for wide screen format, etc..).
  5. Select "save as" and convert modified RAWs to JPEGs
 Animation Process in Photoshop:
  1. Open Photoshop
  2. File > Open > Select 1st image in the series > check "Image Sequence" option box > click Open (FYI, for this to work, all images must be sequentially named, any gaps in the series will pose a problem)
  3. Select frame rate. Usually anywhere from 24 to 30 should be ok. The one above is at 26fps (or photos per second)
  4. Preview your animation, and if you're happy with it go to File > Export > Render as video
  5. Select video format and tweak the options to your taste.  The example video was set at 26fps and contains total of 249 exposures.


And that's all there's to it (:  By the way, if you don't have photoshop or any other video compilation application, you can use StarTrails software. It's free, and it does both: stacking and video.  Clear skies and happy shooting (:

8.30.2008

Photoshop Tips&Tricks: Focus/Shake Recovery

Some images may be recovered or made better from camera shake or bad focus by a simple Photoshop sharpening technique. The results really depend on how badly the image is affected.

1. Open image and duplicate layer (Layers -> Duplicate Layer. Name your layer "Sharpening Mask")
2. Change blending mode of the "Sharpening Mask" to Luminosity (Layer -> Layer Style -> Blending Options. Select Blending Mode to Luminosity)
3. Unsharp image (Filter -> Sharpen -> Unsharp Mask. Select appropriate settings to taste. If image quality is severely degraded, amount is usually kept to higher numbers. Radius and Threshold values are usually kept very low (e.g. 1).
4. Duplicate "Sharpening Mask" layer, and apply Gaussian Blur filter to recover image quality.
5. Modify layer's opacity to your taste and apply Color blending mode to the layer (Layer -> Layer Style -> Blending Options. Select Blending Mode to Color).
6. Modify Curves/Levels adjustment to help bring out the detail.
7. Flatten layers to finalize image processing.

This image is very blurry due to the camera shake during the exposure. While letters offer some readability, architectural and stain glass detail is severely brulled out.

After applying sharpening mask technique on the image, smaller letters are more readable, and detail is recovered in the architectural detail and stained glass. This solution is not perfect for severely blurred images, but work really well in less extreme cases of camera shake and soft focus.

Photoshop Tips&Tricks: Contrast Mask

Very often times composition will create light/exposure challenges. For example, very bright sky and dark ground. Another common occurrence is intentionally under- or over-exposing the image in order to capture important detail. This is common when trying to retain bright colors and highlights of the sunset or details in dark object(s) near a strong light source.

As a result of scewed exposure, portion of the photograph unavoidably contain too much dark or light areas. One of the ways of compensate for this drawback is to use HDR technique (covered in previous post). However, that may not always be possible. Further, HDR introduces "surrealistic" feel to the image, and this may not always be artistic intent. The simpler approach is to use Contrast Mask easily rendered in Photoshop (although this technique does have roots in film photography dating to nearly 100 years ago). It is best that contrast mask is applied to images in RAW format, but works just as well with JPEGs. Here's how:

  1. Open the image and create duplicate layer of the background (Layer -> Duplicate Layer). Name your layer "Contrast Mask"
  2. Convert "Contrast Mask" to monochrome image (Image -> Adjust -> Desaturate)
  3. Covert "Contrast Mask" to negative (Image -> Adjust -> Invert)
  4. Apply overlay blend to the "Contrast Mask" (Layer -> Layer Style -> Blending Options. Select Blending Mode to Overlay).
  5. Reduce image degradation by blurring (Filter -> Blur -> Gaussian Blur. Select desired pixel radius value. Larger values tend to introduce halos on sharp contrast areas, while low amounts minigate the effect.
  6. Adjust opasity of "Contrast Mask" to the desired level (usually anywhere from 50-80%)
  7. Fine-tune the image by adjusting levels and curves to your taste (Layer -> New Adjustment Layer -> Levels/Curves. Check the box "Use Previous Layer to Create Clipping Mask" to apply changes to the "Contrast Mask").
  8. Flatten layers to finalize image processing.

This image was intentionally underexposed in order to capture sun beam highlights in the sky. As a result bottom portion of the photograph is too dark. Adjusting curves or contrast of the image will sacrifice the dramatic sun beams of the sky rendering them hardly visible.


After applying contrast mask, the colors and highlight of the sky were retained, and initially very dark areas were brightened to reveal all the detail and color.

6.15.2008

Photoshop Tips&Tricks: HDR

This is a quick and dirty introduction to creating HDR (High Dynamic Range) images with Adobe Photoshop. This works in both CS2 and CS3 versions.

HDR is "new" and HDR is cool. It can help to resolve many exposure challenges that are presented when photographing various objects and scenes. One of the most common examples of this a scene that frames both: indoor and outdoor scenario. Most commonly, indoor portion of the photograph will come out underexposed with detail flat and dark while outside will be overexposed with highlights blown out of proportion. Even when photographing landscapes, tricky lighting make it very difficult to find a proper exposure balance for all the elements in the shot. HDR can help. The technique is most effective when applied to scenes with relatively still objects.

By taking a series of bracketed exposures (in other words 3 or more photographs each taken at different exposure value), the resulting images each will contain different level of detail located in various areas that are properly exposed. By then combining these, the resulting image will encapsulate all of the detail that would be impossible to obtain in one shot.

So, here's how to get started. First and foremost, it will make it very easy to achieve best results if all photographs are taken when camera is mounted on a stable surface or a tripod. This will save a great deal of processing power because processing alignment of the images for merging will be minimized (in some cases alignment fails, so it should not be relied upon) . Next, take a series of shots with different exposure values varied at 1 stop each. Three is the minimum requirement to process the images in Photoshop, but depending on the lightning challenges there can be as many as reasonably needed (usually around 6 or so in most cases).

Photoshop produces best results with images in RAW format, so using them is encouraged. Once you have the series of the images with variant exposures, HDR process is as follows:

1. Create 32-bit HDR image file
- select Open -> Automate -> Merge to HDR
- load set of source photographs for processing
- check "Attempt to Automatically Align Source Images" to ensure proper alignment
- click 'Ok' to initialize HDR processing
- HDR tool then displays a preview file with resulting histogram from all images. It may look very dark or very bright, but do not be alarmed. HDR tool will also display the "White Point" slider preset at the most optimal point according to the algorithm. It is not always reliable as some highlight detail can be lost with the automated setting. Usually shifting the slider towards maximum value fixes this problem.
- Click 'Ok' to generate 32-bit HDR image file

2. Convert HDR to 16-bit (or 8-bit) LDR (Low Dynamic Range)
- Select Image -> Mode -> 16 (or 8) -bit Channel
- Once file has been converted to LDR, HDR Conversion tool will allow to adjust the image for digital processing. This is the final step in creating desired image. Four options are available via this tool:
  • Exposure and Gamma
  • Highlight Compression
  • Equalize Histogram
  • Local Adaptation
Each one of these settings will allow you to adjust image's contrast and brightness to achieve the desired effect. Most flexible is "Local Adaptation" as it uses data based on pixel-per-pixel range to adjust values rather than image information in whole. Experiment with various Radius (range affected based on pixel location) and Threshold to achieve the desired results. In most cases, HDR created images require some additional processing to adjust saturation levels and reduce noise.

Below is an example of an image created via HDR tool in Photoshop.

Photoshop Tips&Tricks: How to even out skin tone

Flawless complexion can be achieved in Photoshop in just a few easy steps:

1. Open the image to be modified
2. Duplicate the layer to safeguard against mistakes (Layer -> Duplicate layer)
3. If desired adjust image overall contrast via curves (Image -> Adjustments -> Curves), and duplicate the layer (step 2)
4. Convert Layer to Black and White mode (Image -> Adjustments -> Black and White)
5. In the "Preset" drop down list select to apply "Red Filter" to enhance for milky complexion
6. Apply "Soft Light" to the layer and set Opacity to the appealing level (usually range of 55-80%)