 When moving in abstract photography direction, just about everyone wants to take amazing pictures of smoke. Surprisingly, they are very easy to capture. The greatest challenge however, lies in setting up the rig to stage a great shot. There is a bit of experimenting involved, and there is not a single "right" way of doing it. The general approach to help you get started, however, is as follows:
1. Dark room and illuminating the smoke in a right way is a key to a successful image, so it is best to do this in the night time. Also keep in mind that smoke must be relatively still, hence it is not recommended that you do it in a space where there's a great deal of draft, but keeping room well ventilated is important for your own safety.
2. You will need a source of smoke, and incense sticks work great.
3. A black backdrop against which photograph of smoke will be taken.
4. Lastly, a flash.
General Setup:
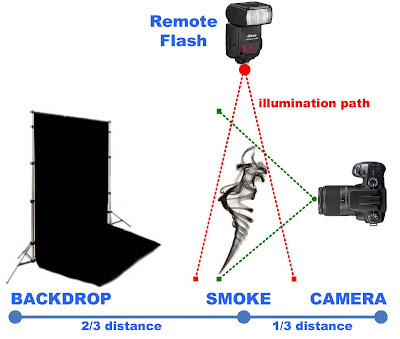
Below is the diagram of a general layout for shooting the smoke photographs. It is best if you have a remote flash and can illuminate the smoke from a perpendicular angle, however direct flash will work as well, just be aware that it may highlight the backdrop and ruin the contrast effect. To remedy this, move smoke source further away from the backdrop and try to adjust your flash settings to fire at closer distance (refer to your flash manual on manual adjustment of internal light meter). Trick here is very similar to photographing something at night. Flash illuminates your object while background remains dark. It is a bit more challenging in the constrained space, but still possible.
Camera settings:
Open your lens to the smaller aperture settings (such as f/16-22). This will ensure that most of the image is in focus. The shutter speed is also important because you're attempting to freeze motion. However, most cameras will be limited to the shutter speed of 1/250 with flash enabled. Another important thing to keep in mind is your ISO settings. Choosing the lowest ISO setting possible will help to reduce the noise (dark images are severely prone to noise). Going above 400 is not recommended. 100 of course is ideal. It is best to set your camera in manual (M) mode, and then adjust the aperture and shutter speed settings as necessary to get the desired results.
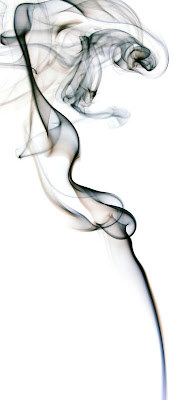
Now you're all set, so most importantly don't forget to have fun. There's plenty to experiment with. One of the great ways to enhance the image is the use of colored gels on your flash to give smoke different color characteristics. Mixing and/or overlaying gels of different colors yields to spectacular results. Smoke images also lend themselves to be great candidates for digital editing. Fantastic photographs can be achieved by adjusting saturation levels or inverting the image.
And, of course, if you're looking to be inspired check out the Flickr: The artsmoke Pool


No comments:
Post a Comment