 There's probably nothing worse than viewing your photograph on the big computer screen and seeing that photo is too soft or blurry: great shot has been ruined and no amount of sharpening is going to fix the image. You've been a victim of camera shake. Blurring occurs because camera was not stable during the exposure (while the image was recorded). The problem is common, and it's because we're human. No one can hold the camera perfectly still, and longer the focal length at which the photograph was taken, more profound the impact unsteadiness has on the image. Even with camera mounted on a stable surface, pressing the shutter release button (or in some cases even mirror movement) may cause enough vibration to introduce blur into the image.
An ideal way to eliminate camera shake is to use the tripod with a shutter release cable or a more advanced setup, but that may not always be possible. Below are some tips that will mitigate unintentional motion blur:
1. Monopod
Monopod is a great alternative to tripods as they do not limit your mobility. They are ideal for use in sports photography because they allow pan movements and relocation with ease. Monopods are usually lightweight and offer fair support to help stabilize a camera.
2. Shutter speed control
When possible to increase your shutter speed, camera shake can be prevented by adjusting your shutter to out-fast the shaking of the hand. The ideal shutter speed should be set at or faster to the inverse of your focal length. For example, if image is taken at 200mm, the shutter speed should be set to 1/200 or faster. DSLR FOV (field-of-view) should be taken into consideration. Most modern digital cameras will have 1.5 FOV crop (refer to the camera manual for your crop factor). That means that lens' actual focal length is multiplied by crop factor to be equivalent to focal length that you're shooting at with DSLR. So, at 200mm, the actual focal length is 200mm x 1.5 = 300mm. Hence, the shutter speed should be adjusted to 1/300 or faster to avoid camera shake.
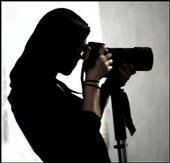
3. Holding the camera correctly
How you hold the camera makes a very big difference as well. If both hands are placed on camera body, the lens roams and worsens camera shake effect. However, if one hand is placed under the lens on its outer edge to stabilize it, the effect would be minimized. Elbows should be tucked firmly on the sides of your torso. You can also help to minimize shaking by firmly pressing your face against the camera while looking at the view finder and holding the breath while taking a shot. Maintaining relaxed body posture will eliminate instability caused by muscle tension. Further sturdiness is achieved by moving your legs shoulder-width apart. Remain still for a moment after the shot has been taken. Often times, premature movement induces the blur effect.
4. Anti-shake technology
There is a variety of lenses available to specifically address the problem of camera shake. These types of lenses will not help you in action photography (such as sports), but can help reduce and even eliminate camera shakes with relatively still objects.
Nikon calls it VR (Vibration Reduction)
Cannon calls it IS (Image Stabilization)
Sigma calls it OS (Optical Stabilization)
Tamron calls it VC (Vibration Compensation)
....and there are a few others
They come with a hefty price tag, BUT they help and they work. Keep in mind, these lenses do not perform miracles, just improve your odds. I feel it's a good investment, and have gotten outstanding results with my Nikon VR lens. Some camera models (e.g. Sony, Olympus, Pentax) have anti-camera-shake technology built into the camera body rather than lens.
5. Shock absorption
In macro-photography or at extreme zooms even slightest vibration can ruin the shot. Chances are even with a tripod, the vibration that occurs with shutter release action and mirror movement can introduce blurring. Using shutter release cable will help. Neutralizing mirror movement is tricker, but placing a weighted wrap (such as a bean bag or a relaxed hand on top of the lens with gentle press) will absorb the vibration.
Using methods above alone or in combination will help to achieve relatively blur-free images. Just as anything, the results do get better with more experience and experimenting. Happy shooting (:


2 comments:
6. Safety shots - Snap a few more photos, just in case. ;)
True! It's always a good idea to take a few extra shots (if circumstances permit). I find that when using VR at 1/4 sec exposure with 200mm zoom it takes me on average 3 shots to get a crisp and clear image. However, when exposure is that long or longer, tripod may be the only way to go (:
Post a Comment